
Background and Introduction
A core use case for many scientists is being able to access their systems and data when they are off-site. With today’s ever present security threats, providing a way to enable this remote access in a way that is secure, simple, inexpensive and easy to administer is a key element of scientific systems design. A common way to do this is via a commercial VPN solution authenticating to an existing directory service (most frequently Microsoft’s Active Directory), but the licensing costs for these solutions can be expensive, and may not necessarily meet customization requirements. Additionally, updates and upgrades can be contingent on costly capital expenditure in the form of new firewall hardware. “Stand up a free remote access VPN authenticating to AD (or other LDAP server) with OTP two-factor authentication” seems like a fairly common use case; it’s deployed in a paid iteration at plenty of businesses, government agencies, and in other organizational infrastructure.
Here at the BioTeam Convergence Lab, we needed a remote access solution for as little cost as possible that still leveraged reliable, secure technologies and would be fairly easy to administer. Yet, after having Googled around for a while, looking for a comprehensive guide to how to do this, I came up only with pieces of a solution, but not the whole enchilada. So, here it is, fresh out of the oven.
The general workflow is as follows: you have an existing user directory service, such as FreeIPA or Active Directory, and a network infrastructure such that you can either expose firewalled machines directly to the Internet or forward ports through a router performing NAT or PAT to a machine inside your network. You want to stand up a remote access VPN that allows users on the Internet to connect remotely to this infrastructure and be authenticated with a combination of your user directory and a TOTP app like Google Authenticator (or FreeOTP, or any number of other mobile apps that use the OATH spec). To accomplish this, you’ll set up a server on your network that will both serve OpenVPN connection requests and perform authentication both to e.g. Active Directory and, in this case, the Google Authenticator PAM plugin. This one machine will combine SSSD (software that can bind a Linux machine to a directory service), PAM (software that manages authentication, logins, etc.), Google Authenticator, and OpenVPN to accomplish everything. The best part of this arrangement is that no RADIUS server is necessary!
This is a fairly modular setup. You could leave out the SSSD part and just authenticate your VPN to a given computer’s local PAM database rather than to an Active Directory or FreeIPA server. You could leave out the Google Authenticator part, especially if you’re only going to have one user, and just depend on password authentication plus your client certificate to secure logins.
Some Notes on Use Cases
The caveat here, of course, is that this won’t scale terribly well. You might be able to extract some reasonably good performance out of a sufficiently well-equipped machine up to about 50 simultaneous users, but things will begin to degrade after that. This is okay! This is not a commercial VPN solution and shouldn’t be treated like one. It is, however, a great option for small networks, including out-of-control homelabs like mine. The envisioned environment for a setup like this is “users who are technical enough to SSH into a machine and run a script, and admins who would rather let their users do this than go through the pain of generating and managing individual client configurations and keys for every user.” If that looks like your lab, office, or other small network, then these instructions are for you. So, let’s break down how to set this up. Note: I’ve linked all the source documents I’ve glued together to make this at the bottom of this article; I highly recommend checking those out as well for additional details!
Preparation
You’ll need a physical server or VM running CentOS Linux. I suspect you could probably make the tun device (the network device magic that makes all this work) work in an lxc container, but that’s out of scope here.
Make sure you do:
sudo yum install epel-release && sudo yum updateto get everything updated before continuing.
Components
- Samba
- SSSD
- PAM
- OpenVPN
- Google Authenticator
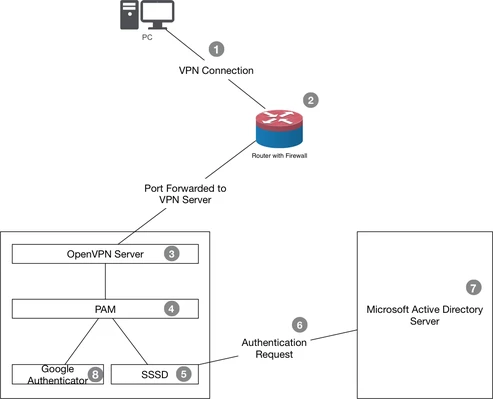
This diagram demonstrates the flow of authentication when a user attempts to connect to the VPN (1). The firewall should be configured with a port forward (2)—usually UDP 1194—to the VPN server located inside the firewall. The server then uses the openvpn-plugin-auth-pam plugin (3) to forward the authentication request to the server’s PAM daemon (4). PAM is then configured to authenticate via SSSD (5). SSSD has joined the machine to Active Directory, so it makes an authentication request (6) to Active Directory (7) to validate the user’s password information. If the user has a valid .google-authenticator configuration in their home directory, PAM strips off the last 6 characters of the user’s entered password and validates that separately with the user’s stored TOTP key (8).
SSSD Installation and Domain Joining
-
- Install the packages for SSSD and the attendant other packages:
sudo yum install sssd realmd oddjob oddjob-mkhomedir adcli samba-common samba-common-tools \
krb5-workstation openldap-clients policycoreutils-python -y
This will install a bunch of dependencies. That’s fine. It will probably ask you for a “default realm,” here you should give it the FQDN of your domain, but in ALLCAPS, like
EXAMPLE.DOMAIN. - Join the machine to the domain. This is fairly simple for Active Directory at least; LDAP and FreeIPA domains may require additional configuration:
sudo realm join --user=administrator example.domainAny domain admin user should be able to do the join operation.
- Typically in the environments I work in, it at a minimum it makes sense for Windows Domain Admins to also have root on Linux machines, so do:
sudo visudoand add that group in the group section.# Members of the admin group may gain root privileges %admin ALL=(ALL) ALL %domain\ admins ALL=(ALL:ALL) ALL -
We have some edits to make to the SSSD configuration file in/etc/sssd/sssd.conf. (Nano happens to be my usual editor of choice; vim or emacs work fine too!)sudo nano /etc/sssd/sssd.confUnder the section for the domain you’ve joined, add these lines:
[domain/EXAMPLE.DOMAIN] override_homedir = /home/%d/%u #This gives the PAM module that makes home directories a path to use. #This will create paths that look like /home/example.domain/username. #You don't have to do this -- you can specify /home/%u if you want for "normal" directories. default_shell = /bin/bash #If you don't specify this, you get terrible unformatted user prompts -- #probably thanks to /bin/sh -- when you log in. use_fully_qualified_names = false #Otherwise, you have to log in as user@example.domain@host.fullyqualified.net, #which, oof, no thanks. Setting it to "true" may be useful for #deployments with multiple domains, of course. - Reboot, just for good measure.
- Log into the machine with ssh like
ssh user@host - Test sudo with a simple
sudo ls.
- Install the packages for SSSD and the attendant other packages:
Now you should have a functional connection to your Active Directory server, which should let you authenticate SSH logins to AD. This means that PAM can authenticate logins to AD, which is part of the core of our VPN solution.
Installation of OpenVPN Server and Cryptography Setup
- Install the packages:
yum install openvpn easy-rsa -y -
Create a new server.conf file with:
sudo nano /etc/openvpn/server.confYou can use the options here:
port 1194 #- port proto udp #- protocol dev tun tun-mtu 1500 tun-mtu-extra 32 mssfix 1450 reneg-sec 0 ca /etc/openvpn/easy-rsa/3.0.3/pki/ca.crt cert /etc/openvpn/easy-rsa/3.0.3/pki/issued/server.crt key /etc/openvpn/easy-rsa/3.0.3/pki/private/server.key dh /etc/openvpn/easy-rsa/3.0.3/pki/dh.pem plugin /usr/lib64/openvpn/plugins/openvpn-plugin-auth-pam.so openvpn #- This path is where the plugin installs on CentOS 7. # It may be located elsewhere on your distribution – # you can do a "find / -name openvpn-plugin-auth-pam.so" to confirm. username-as-common-name server 10.8.0.0 255.255.255.0 #- In this example we've chosen 10.8.0.0/24 as our subnet of addresses for VPN. # You can choose whatever makes sense for you as long as it is a private, # non-publicly-routeable address range. push "redirect-gateway def1 bypass-dhcp" #- This forces the VPN server to be the default gateway for VPN clients. push "dhcp-option DNS 192.168.9.20" #- These DNS options will be the DNS servers passed to the client push "dhcp-option DNS 192.168.9.21" duplicate-cn #- This option allows you to use the same client config with multiple clients user nobody group nobody keepalive 5 30 comp-lzo persist-key persist-tun status vpn.log verb 3 log-append /var/log/openvpn.log - A few notes about the above server configuration:
- We’re using the
duplicate-cnoption to permit more than one client to log in with the same client config. In other OpenVPN deployment guides you’ll see elsewhere on the web, they’ll have you instead generate a separate client configuration for each client connecting to the server. Multiple configurations (including multiple client keys) is more secure in the sense that it’s effectively a “something-you-have” form of two-factor authentication, but becomes a pain to maintain quickly as you grow the size of your deployment, and is superfluous with our configuration because we’re adding two-factor authentication in the form of Google Authenticator. - The “
redirect-gateway” option is there for sending all your traffic over the VPN. If you only want to use the VPN for remote access to a network and are fine with other traffic going over your existing connection, you can leave this option out. - Depending on how sneaky you want to be about running your VPN, you may want to change
proto udptoproto tcp(some outgoing firewalls block UDP traffic except on port 53, some even block that and force internal DNS), or changeport 1194to e.g.port 443(to sneak through the https outgoing firewall hole). All depends on your use case. For our example, we’ll leave it at 1194 and UDP. Note that UDP is almost always faster than TCP, so if performance is a need for you (especially in terms of latency), you’ll want to leave it running on UDP.
- We’re using the
- Create a PAM configuration file for use with the PAM plugin above:
sudo nano /etc/pam.d/openvpn auth [user_unknown=ignore success=ok ignore=ignore default=bad] pam_securetty.so auth include system-auth account include system-auth password include system-auth - Copy the easy-rsa scripts from /usr/share/easy-rsa into the /etc/openvpn directory for use with your VPN instance:
cp -r /usr/share/easy-rsa /etc/openvpn
- Change to that new easy-rsa directory and begin setup:
cd /etc/openvpn/easy-rsa/3.0.3
(Your version number may differ from 3.0.3.) - These commands create a new certificate database:
./easyrsa init-pki
./easyrsa build-ca
./easyrsa gen-dh
These commands will build a directory in
/etc/openvpn/easy-rsa/3.0.3/pkicontaining all the files you’ll eventually need. (Recall that we referenced this in our server configuration file above.) - This sets up your server certificate:
./easyrsa build-server-full server nopass
This creates an unencrypted server certificate in
/etc/openvpn/easy-rsa/3.0.3/pki. - This sets up your client certificates:
./easyrsa build-client-full client nopass
- Those steps will have created the proper certs to allow your client to connect. What we’re going to do for ease of installation and portability is embed the certificates and keys into your client .ovpn file. Your client configuration files can be found in
/etc/openvpn/easy-rsa/3.0.3/pki/issued/client.crtfor your client certificate,/etc/openvpn/easy-rsa/3.0.3/pki/private/client.keyfor your client key, and/etc/openvpn/easy-rsa/3.0.3/pki/ca.crtfor your CA certificate. Create the .ovpn file like so, and then paste the following content into it. Note that your protocols and ports must match between your server and client configuration files.
nano ~/client.ovpnclientdev tunproto udpport 1194remote yourpubliclyrouteableIPaddressordomain.comresolv-retry infinitenobindtun-mtu 1500tun-mtu-extra 32mssfix 1450persist-keypersist-tunauth-user-passcomp-lzoreneg-sec 0verb 3<ca>-----BEGIN CERTIFICATE-----RANDOM-LOOKING TEXT FROM YOUR CA CERT GOES HERE-----END CERTIFICATE-----</ca><cert>-----BEGIN CERTIFICATE-----RANDOM-LOOKING TEXT FROM YOUR CLIENT CERTIFICATE GOES HERE-----END CERTIFICATE-----</cert><key>-----BEGIN PRIVATE KEY-----RANDOM-LOOKING TEXT FROM YOUR CLIENT KEY GOES HERE-----END PRIVATE KEY-----</key> - Now we’ll make some networking changes on the VPN host. We’re going to enable forwarding on the host – here is a place where things differ slightly depending on distribution. You’ll want to look it up if these things don’t seem to work. Open the sysctl conf file:
sudo nano /etc/sysctl.conf - Uncomment the line,
net.ipv4.ip_forward=1
Save, close, then dosudo sysctl -pto load the changes you made in the file. - Now we’re going to set up iptables to forward traffic and perform NAT between the network and the “virtual” client network. In the default server.conf file, this network is 10.8.0.0/24. You can make it anything you like; in our case we changed it to 10.8.0.0/24. You can type these commands out directly on your command line; when you’re finished you’ll save them by performing:
sudo iptables-save > /etc/sysconfig/iptables.
This will save your iptables settings in a file in/etc/sysconfig/iptableswhich is loaded by theiptablesservice at boot. To be sure these are restored later, do:
systemctl enable iptables.
Please note: You can see there is an interface name in these commands; in this case it’s just “eth0.” In newer versions of Ubuntu Linux and CentOS Linux, these interfaces are often named “ens18” or other such names – you’ll want to be sure the interface name matches whatever you have on your system with an “ip a” command.
# Forward traffic from VPN to LAN; in our case the LAN is 192.168.9.0/24 iptables -I FORWARD -i tun0 -o eth0 -s 10.8.0.0/24 -d 192.168.9.0/24 -m conntrack --ctstate NEW -j ACCEPT # Forward traffic from VPN to Internet iptables -I FORWARD -i tun0 -o eth0 -s 10.8.0.0/24 -m conntrack --ctstate NEW -j ACCEPT # Forward traffic from LAN to Internet iptables -I FORWARD -i eth0 -o eth0 -s 192.168.9.0/24 -m conntrack --ctstate NEW -j ACCEPT # Forward traffic related to established connections back and forth iptables -I FORWARD -m conntrack --ctstate RELATED,ESTABLISHED -j ACCEPT # Perform NAT from VPN to world iptables -t nat -I POSTROUTING -o eth0 -s 10.8.0.0/24 -j MASQUERADE # Perform NAT from LAN to world iptables -t nat -I POSTROUTING -o eth0 -s 192.168.9.0/24 -j MASQUERADE - You should be able to start the server now with:
sudo systemctl start openvpn@server.
Make sure you also configure systemd to keep it running with:
sudo systemctl enable openvpn@server.A note about the
systemdservice names above – the “@” lets you have multiple configurations of the same service act like different services, depending on the name of the configuration file. In our case, our server configuration file name isserver.conf, so when you dosudo systemctl start openvpn@server, you are tellingsystemd“start an OpenVPN server with the service configuration file namedserver.conf.” You could also have another configuration file for testing calledtesting.confand manage it similarly withsudo systemctl start openvpn@testing. This is useful when debugging different configuration options when you don’t want to disturb your original configuration, and also for running more than one service of the same kind on the same machine (on different ports). - Import your .ovpn file for your client into whatever OpenVPN client you’re using (mine is Viscosity for Mac, works great) and test with your username and password from the directory server you joined at the beginning of these instructions. Depending on your VPN client, this may not import quite right and you may have to manually change settings in your client profile like “ask for username and password” or “force all traffic over VPN.”
- At this point your VPN should be able to function with username and password authentication against Active Directory. If you don’t care about a second factor for authentication, you can stop here. (But you should care!)
Installation of Google Authenticator
This is comparatively quick! You’re going to install the packages in question, make some PAM changes, and you’re off and running.
-
-
sudo yum install epel-release google-authenticatorto install.
nano /etc/pam.d/openvpnto edit the PAM configuration file you created earlier:
auth [user_unknown=ignore success=ok ignore=ignore default=bad] pam_securetty.so
auth       required     pam_google_authenticator.so forward_pass nullok
auth       include      system-auth
account    include      system-auth
password   include      system-auth
The “
nullok” instruction above tells PAM that if a user isn’t set up with Google Authenticator, they can still log in. You may want to remove this eventually in order to enforce two-factor authentication on your VPN.- Now you can set up Google Authenticator for your user. Note that everyone who will log into the VPN will need to log into this server via ssh to set up their second factor. You will need an OATH-compatible TOTP app for your phone or other mobile device. The Google Authenticator app will work for this, so will many others, including the ones intended for other two-factor systems like Duo Mobile. At the command line, run:
google-authenticatorThis will start the setup.
- Answer y to the “time-based” question. This will produce a QR code for photo registration, or you can use the alphanumeric secret key presented after that.
- Answer y to updating your
.google-authenticatorfile. - Answer n to give yourself a little more wiggle room for entering codes.
- Answer y to permit token time skew.
- Answer n for rate-limiting or you may find the OpenVPN server producing strange behavior when you get your password wrong. This will finish off your
.google-authenticatorconfiguration file. - Now, to log in, when you start connecting and it asks for your username and password, in the password field you’ll type your password immediately appended by the current TOTP code from your app. For example, if your password is “Iliketacos” and your current code is “888888,” you’ll type your user name as normal in that prompt and “Iliketacos888888” for your password.
When it’s time for new users to enroll, they’ll log into this VPN server via SSH, type “
google-authenticator,” follow the steps from 4 to 10 above, and be ready to go without additional intervention from systems administrators. Hurray! 🎉That’s It!
This is a long, somewhat time-intensive process, but when you’re finished you have a secure VPN server that you can position inside your private network, forward a port from a public IP, and use both for access to resources on your network and for tunneling traffic on insecure networks to your (hopefully secure!) own network. One thing I’d really like to do is see how many simultaneous logins this setup can support. Please report back if you put this into use and get to scale up the peak number of simultaneous users on it. It should be limited only by the network and memory limitations of the host machine. Enjoy!
To-Do
In a future article, we’ll publish source code for an Ansible playbook that automates much if not all of this for you. As we all know, consistency is the key in infrastructure deployment!
Source Material
help.ubuntu.com/lts/serverguide/sssd-ad.html
www.rootusers.com/how-to-join-centos-linux-to-an-active-directory-domain/
github.com/OpenVPN/easy-rsa/blob/v3.0.0-rc1/README.quickstart.md
www.thomas-krenn.com/en/wiki/Saving_Iptables_Firewall_Rules_Permanently
securityskittles.wordpress.com/2012/03/14/two-factor-authentication-for-openvpn-on-centos-using-google-authenticator/
www.digitalocean.com/community/tutorials/how-to-set-up-multi-factor-authentication-for-ssh-on-centos-7 -