Integrating Linux Dnsmasq DNS Server with Isilon Smart Connect Load Balancing
What is Smart Connect?
You can read the marketing description here: http://www.isilon.com/smartconnect.
In short, it’s a very cool feature of Isilon NAS arrays that neatly sidesteps some of the major issues with running vanilla NFS shared filesystems in large environments or in demanding high performance situations. With standard NFS servers it is very easy for the network link or links to become the throughput bottleneck and the various ways of engineering around this are sort of painful from an operations perspective.
Isilon NAS clusters, however, share a single namespace and have a large private Infiniband-based private network fabric and this means that we can point our NFS client machines at any participating network interface within the cluster. In the four-node cluster I’m using for this blog post, each of our four nodes has two 10-Gigabit network interfaces in addition to the standard pair of 1-Gig interfaces.
Smart Connect lets me use all 8 10Gigabit Ethernet interfaces on my Isilon NAS array to simultaneously service Linux HPC cluster clients. Eight 10-gig network cards is a lot of aggregate bandwidth that I can use to “get work done” on my cluster.
Think of it as a clever way of automating NFS failover and multi-NIC/multi-node NFS load balancing without requiring special or proprietary software on our client nodes. Our clients simply use standard NFSv3 to get at the shared storage pool.
WTF is DNS involved?
The “trick” with smart connect is that each Isilon NIC gains many different IP addresses (often a 1:1 ratio of IP address pool to potential client host count…). The IP address pool spread across all participating NICs means that each one of our NFS client machines can do an NFS mount to a unique IP address.
Having each NFS client mount a different IP address to get at the shared storage opens up some very interesting possibilities:
- Using standard ethernet ARP tricks we can ‘move’ IP addresses from NIC to NIC and Node to Node
- Being able to ‘move’ IP addresses around the cluster gives us implicit NFS failover since a different NIC can pick up the IP addresses(s) being used by a failed unit
- IP address movement between and among Isilon cluster nodes also lets us implement a managed load balancing policy – we can shape things to smooth out network traffic among NICs or we can load balance based on other factors such as CPU load within the participating storage nodes.
The central question then becomes, “how do we get our clients to mount the Isilon storage via unique IP addresses?“.
The answer? Use a DNS server to answer requests for the storage system. Each time a client makes a DNS request, spit back a unique IP address that belongs to the smart connect pool.
The Isilon storage system itself contains an embedded DNS server that is able to respond to delegated client queries. It is not a full-fledged nameserver and should not be used for anything BUT answering requests from potential storage clients.
This means we need one more piece of code to pull everything off — a DNS server on our Linux cluster that is capable of intercepting queries for a particular zone (“isilon.cluster.private” in our example) and referring or delegating the answering of that query to the special Isilon “Smart Connect Service IP”.
Why this blog post?
Simple really.
- The Isilon Admin Guide only documents how to set up DNS zone delegation on a Windows-based system
- Isilon KB Article #737 “Creating a UNIX-based bind DNS setup for use with SmartConnect” only covers the use of the BIND DNS server
- Neither are particularly comprehensive
This blog post is google-bait, pure and simple. Hopefully it will save some poor soul a day or two of time as they wait on Isilon Support or flail around trying to get this stuff to work on Linux with something other than BIND handling the DNS work.
Learn from my mistakes

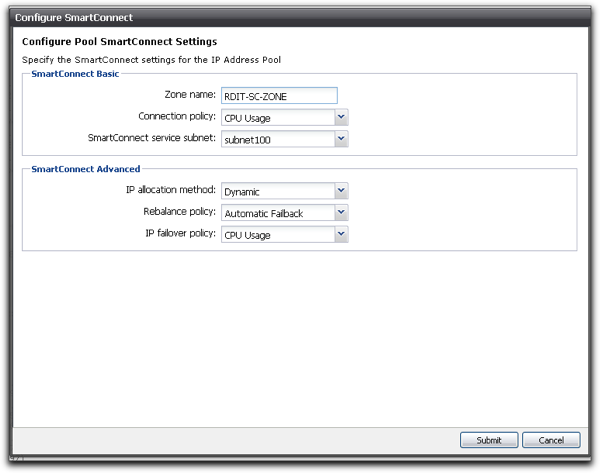
To be honest, I made a pretty dumb mistake which is shown in the above screenshot. My mistake was using a descriptive term in the field for “Zone Name”. What you really need to load into that field is the actual DNS zone that you want the embedded server to answer requests for. Really obvious in hindsight but something that I totally missed because I had set up that particular network configuration many weeks before it became time to actually try to use and test Smart Connect.
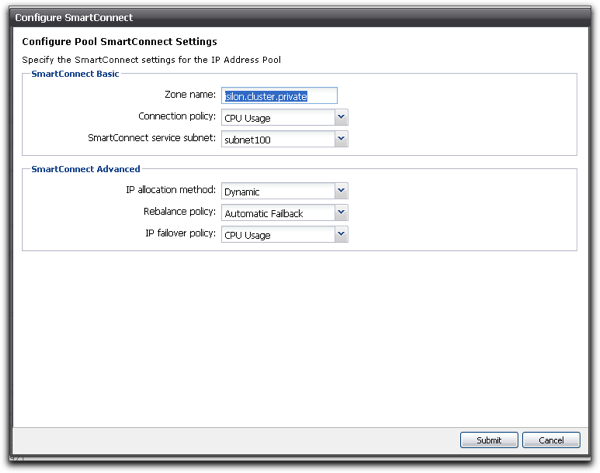
The solution (see screenshot below) is to actually insert the real DNS zone you intend to use into the Smart Connect “Zone name” field. Yeah it’s that simple and I’m a moron for wasting a day trying to figure out what the heck I was doing wrong …

Dnsmasq Configuration for Isilon Smart Connect Delegation
BIND is a perfectly excellent DNS server that has been in production use for many many years. I use it myself on a bunch of different servers. However, BIND is kind of a hardcore piece of software and (in my opinion) it’s way overkill for solving a simple little DNS delegation problem..
Dnsmasq to the rescue …
Dnsmasq is a much smaller and easier to manage DNS server with a bunch of features that make it attractive in small settings or specialized environments like our little private VLAN that holds a bunch of scientific compute nodes.
How easy? Pretty freaking easy.
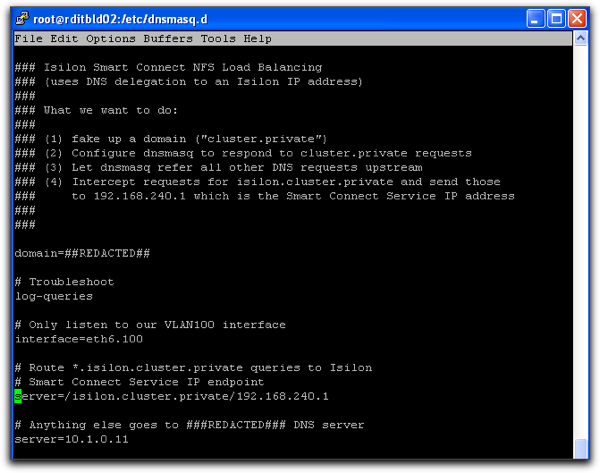
DNS delegation with this package can be done with a single configuration parameter. For example, if the DNS zone I wanted to use for NFS load balancing was “isilon.cluster.private” and my Smart Connect Service IP address was 192.168.240.1 then all I need is this single configuration line:
server=/isilon.cluster.private/192.168.240.1
Thats it. No zone records, no incrementing BIND serial numbers hidden inside text files, just a single line in a simple configuration file and it just plain works.
This is our entire configuration file:

Ok, what now?
That is it basically. Our tiny little dnsmasq server is listening on a single ethernet interface for DNS client requests. Any incoming DNS request for isilon.cluster.private or *.isilon.cluster.private will be delegated to the Isilon Smart Connect Service IP address to answer. All other DNS requests get passed upstream to the traditional DNS servers in use within the organization.
Does it work?
Yep. Check the screenshot below. Each time we ask for the IP address belonging to “isilon.cluster.private” we get back a different answer. This means that our cluster nodes can all NFS mount “isilon.cluster.private:/share” and the Smart Connect system will take care of ensuring that the clients are appropriately balanced across all available cluster nodes and participating NICs.

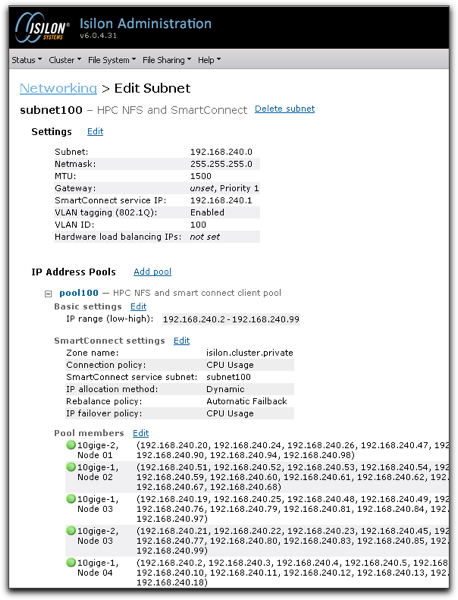
The final screenshot shows a partial view of the Isilon Smart Connect configuration page, buried in the middle you can see the “Zone Name” field that I had used in an incorrect manner. Putting a descriptive term into that field was the cause of all my problems, learn from my mistakes and drop your real DNS zone in there!


