Background
BioTeam is a Massachusetts-based “virtual” company in that all of our employees work from home when not traveling on business. Being from Massachusetts is actually important because as of March 31st, 2010 the state has passed a fairly strict set of laws concerning how companies handle digital data.
Without going into the details of the Massachusetts data protection laws lets just say that there is one key attribute that we as a company fixated on:
- Any company that can prove that a lost/stolen/missing data storage device or computer was encrypted at the time it went missing is exempt from the rules covering mandatory event reporting and public breach disclosure.
Interesting, huh? Just to be straight here the rule does not exempt us from doing anything stupid or illegal. The law is just written so that mandatory press releases and other data loss notification events do not have to happen if the missing device was provably encrypted (and thus unreadable or unusable) at the time it got lost.
I’m totally fine with this law and I’m happy that MA is being aggressive about making sure companies are responsible with sensitive data types and records.
PGP Whole Disk Encryption & PGP Universal Server
I don’t want to shill for PGP so lets cut to the chase and namedrop the software products we chose to allow BioTeam to encrypt all employee digital data in a verifiable way:
- We use PGP Desktop with Whole Disk Encryption on all employee Apple Macbook Pro’s (and a few random Linux & Windows netbooks). The PGP Desktop product does a lot more than just disk encryption but we use it mainly for rendering our laptops unusable without the decryption key as well as to encrypt our USB storage and other portable media devices.
- The real magic, however, comes with PGP Universal Server. This product is an external server that manages our desktop PGP clients including enforcing policy rules, auditing the state of encryption and (handily) making sure that our employee laptops are always loaded with a secondary decryption key that an IT Administrator can use to decrypt the laptop if the staffer ever forgets his or her passphrase.
Make sense? PGP Desktop/w WDE is the product we use on the laptops to do the actual encryption and PGP Universal Server is the product that we use for policy management and to generate an audit trail. This is the software combo that fits nicely our needs under the Massachusetts data protection laws but it’s also just common sense IT procedures for any tech-centric business.
PGP and Small Business
I could write a whole blog post on the nightmare involved in getting someone at PGP to actually sell me this software. It was clear (at the time) that the company itself and it’s legion of resellers simply didn’t give a damn about small customers looking for less than 100 licensed seats. It was only after I left a whiny blog comment on the internet detailing my hassles that someone at PGP reached out and put me in touch with a reseller who understood small business and was willing to sell us a 10-seat enterprise license for Universal Server.
Not sure if things have changed but if you are an Apple shop looking to go down the same road drop me a line and I’ll put you in touch with the reseller who hooked us up. That said though, it looks like PGP now has “small business” and “workgroup” edition software now so maybe our use of Universal Server is overkill for the size of our shop.
Citrix XenEnterprise 4, Universal Server 2 and Apple OS X 10.5
Prior to Apple releasing version 10.6 (“Snow Leopard” of Mac OS X we had things running quite well:
- Virtualization system running Citrix XenEnterprise 4
- PGP Universal Server 2.x running virtual under XenEnterprise 4
- PGP Desktop 9.x running on our laptops
Running Universal Server under XenEnterprise is not supported by PGP but the install worked perfectly off of the supplied .iso image. The main problem we had was that PGP Universal Server would not reliably report encryption status of Apple disk devices. The devices were actually encrypted but the status change rarely showed up in the reporting tools. This was a “known bug” and we were told to sit tight for a future release.
The reason for this post:
PGP Universal Server 3, XenServer 5.5 and Apple OS X 10.6
Now we come for the actual reason for this blog post — documenting the process (painful) of getting PGP Universal Server 3 to actually function while virtualized under the open-source version of Citrix XenServer 5.5.
Warning: I’m leaving out tons of information about the mechanics of actually doing the upgrade/install including the details of preserving your Organizational keypair and an encrypted backup configuration file — both of which are necessary if you want to reload the configuration of your old Universal Server into the new 3.0 system that has to be install from scratch via a CentOS-based .ISO image. Read the PGP docs. Understand also that according to PGP running Universal Server under any virutalization system other than VMWare is also unsupported. PGP will also probably not like you mucking around as root within the Universal Server console as well.
Problems with Universal Server 3 and XenCenter 5.5
The problems I had trying to install from the .iso simplified down into the following issues:
- Booting off of the .iso image and letting the “standard” install happen automatically seems to work all the way through the final reboot. However, when the system comes up after it’s inital reboot it freaks out over what appears to be ext3 related filesystem corruption and hangs forever during the boot process.
- Choosing the “expert” install method results in a python crash that takes out the CentOS Anaconda installer software, leaving you stuck and only able to reboot and start over.
- Choosing the “customnet” install method fails in the same way that “expert” does — a python stacktrace pops up and you are stuck only seconds into the install process
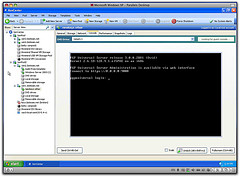
I did find a manual workaround that got us functional (see screen images below). The basic details are below. Hopefully this will help some other poor soul in the same position!
- Boot the PGP .ISO image and choose the “noautopart” install option. For some reason I did not get the anaconda crash when using this method
- Manually partition your disk. Easy for me since I’ve been using CentOS forever but might be hard for some. I chose a very simple partition layout: 100MB ext3 primary partition for “/boot”, a 2GB swap partition, a 2GB ext3 “/tmp” partition, a 3GB ext3 “/var” partition and finally an ext3 partition that spanned the rest of the disk as the “/” root partition.
- The install will continue automatically. One side effect of the “noautopart” option is that the system will not prompt for network setup information and will auto-configure your first NIC to use the IP address 192.168.1.100. Fixing that is the next step
- My system actually booted up after following the above steps except for the fact that the PostgreSQL database failed to start and initialize. I am not 100% sure if the problem was due to not having enough memory in the VM when I first booted it (I mistakenly left it at 256MB) or if the database really wanted a fully functional network before it would properly start up.
- If your database actually initialized then you still have the problem of the hard-coded network settings. To fix these you’ll have to first reboot the server into single user mode by appending “s” or “single” to the kernel parameter in the grub boot menu
- Once you are in single-user mode you can use ‘vi’ to edit the file “/opt/ovid/prefs.xml” — this is the central configuration file that PGP uses to generate all of the specific Linux configuration settings and files. You must edit this file, manually editing network settings or things like /etc/resolv.conf will get overwritten. The file is pretty straightforward XML, just enter the information for your interfaces. A key thing to remember is that if your primary interface is not “Interface 1” then there are a number of lines in the prefs.xml file that refer to what interface is used for critical services — make sure you find and replace all instances of “Interface 1” with the interface you actually plan to use.
There is a command line tool called “pgpsysconf” that can be used for things like “pgpsysconf –network –check” and “pgpsysconf –network” that will (a) check your network settings and (b) reconfigure the server to use them. They are worth using if only to make sure you did not leave any typos or mistakes in the prefs.xml file.
Didn’t mean to be so long winded, the simple process looks like this:
- Boot the ISO, choose “noautopart” and manually partition your disk
- Boot into single user mode so that you can hand edit and fix /etc/ovid/prefs.xml to enter the real networking and IP information
If you have postgres database startup or initialization problems, boot into single user mode and look at the log file that lives in /var/lib/pgsql. All I had to do was delete the “data/” directory there and reboot and PGP automatically reinitialized the database.
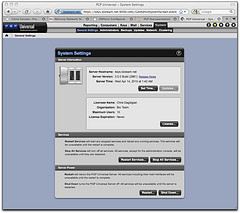
If you made it to this point you have a functional server and you can now use the web interface to upload your Organizational key and backup configuration file. No more need for hacking around within the VM console.
Some screenshots below.